Frequently Asked Questions
Check out our FAQ for installation and usage, purchases and license registration for AppCheck
-
Q.
How do I apply for a tax invoice?
-
A.Individuals/corporate businesses that wish to issue a tax invoice among customers who have purchased AppCheck Anti-Ransomware should send a copy of their business registration certificate and an email address to receive an electronic tax invoice to contact@checkmal.com.
-
Q.
The purchase page only sells licenses for 1/3/5 PCs. Can I purchase a different quantity?
-
A.For AppCheck Pro products, you can purchase 1/3/5 PC licenses with 1 license. If you want to purchase other quantities, please contact sales@checkmal.com
Please apply for AppCheck Pro for Windows Server products through "Purchasing - Quotation and Demo Inquiry" on the CheckMal site.
-
Q.
I lost the AppCheck anti-ransomware license information I purchased. Can I get it again?
-
A.In the case of individual purchasing users, you can receive re-sent to the e-mail address you entered at the time of purchase in "Customer Support - License Management - Resend License" on the Checkmal site.
For other corporate purchase customers, please contact contact@checkmal.com and we will send you a license email again.
-
Q.
Error 0xc0000003 occurs when registering AppCheck Anti-Ransomware.
-
A.Error code 0xc0000003 when registering AppCheck Anti-Ransomware is caused by exceeding the number of licensed users.
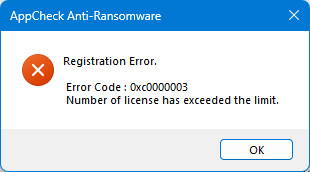
In the case of individual purchase, please enter your email address and license key in the "Customer Support - License Management - License Check" menu on the Checkmal website to cancel registration if there are devices that exceed the number of licenses.
In the case of corporate purchase customers, request a list of registered devices for license initialization to support@checkmal.com, and check and send the deregistered devices in the Excel document received, and we will support initialization.
-
Q.
Is there anything the user needs to modify after renewing the AppCheck Anti-Ransomware license?
-
A.If the existing AppCheck anti-ransomware license information is renewed as it is, the service expiration date is automatically updated within 24 hours after renewal, so there is no additional modification by the user.
-
Q.
How to cancel or refund the purchase after purchasing AppCheck Anti-Ransomware?
-
A.If you request a refund (contact@checkmal.com) by canceling the purchase within 7 days of paying for the AppCheck anti-ransomware product, you can receive a refund within 3 to 5 business days in the same way as payment.
If you have registered the product online using the serial number issued within 7 days of payment, a refund is not possible.
-
Q.
Can I change my AppCheck anti-ransomware license email address?
-
A.In the case of an AppCheck license registered in CMS Business/Cloud central management, it can be modified in the "CMS Access - Settings - License - License Email" menu. However, the CMS Business server must be able to communicate with the CheckMall license server.
In the case of AppCheck Anti-Ransomware-only installation environment, you can request to change your email address through the "Customer Support - Online Inquiry" bulletin board on the Checkmal website.
-
Q.
Can companies use licenses purchased by individuals?
-
A.If you register the AppCheck Pro version as an individual purchase method and then use it in a company, the license purchased by the individual must be purchased and owned by the company under the current law. Not accepted.
Therefore, if it is intended for use by a company, please receive consultation and quotation for corporate purchase.
-
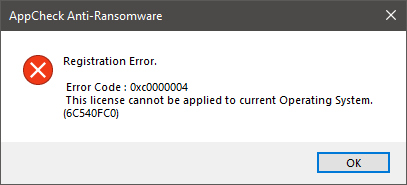
Q.
Error 0xc0000004 occurs when registering AppCheck.
-
A.Since the license used to register AppCheck is for an OS that is not supported, please enter AppCheck Pro for Windows Server license information when registering in Windows Server operating system.
-
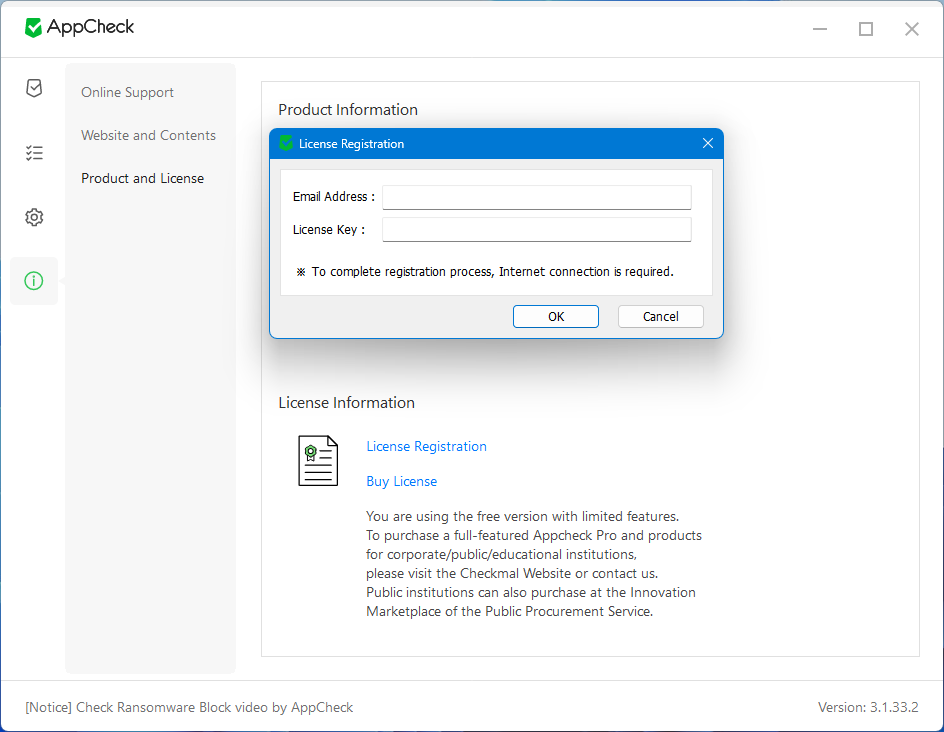
Q.
How do I register AppCheck?
-
A.After installing AppCheck Anti-Ransomware, execute "Customer Center - Product and License Information - License Registration" menu on the main screen and enter the issued email address and serial number.